Setting up the SDK
The Copilot Node SDK is a Node.JS library that makes it easier to perform the following actions:
- Fetching data associated with your Copilot workspace.
- Mutating data associated with your Copilot workspace.
- Determining session information.
Requirements
- A project with a Node.JS backend. The simplest way to set up an app is to follow our guide to setting up your first app.
Installation and setup
If you’re using the Copilot custom-app-base you can skip over this step, as the SDK will already be installed and setup for you.
Add copilot-node-sdk as a dependency in your project:
yarn add copilot-node-sdk
In one of your backend Node.JS files add you’ll need to instantiate the SDK using your Copilot API Key as well as an optional token query parameter that will be passed to your app after it’s installed. We’re going to use the Next.JS app router for our example code here:
import { copilotApi } from "copilot-node-sdk";

type SearchParams = { [key: string]: string | string[] | undefined };

export default async function Page({
  searchParams,
}: {
  searchParams: SearchParams;
}) {
  const copilot = copilotApi({
	  apiKey: COPILOT_API_KEY,
	  token: "token" in searchParams && typeof searchParams.token === "string"
      ? searchParams.token
      : undefined,
  });
};
For more information about tokens, why we need them, and how they work, see the Tokens section of this page below.
Open API
The SDK functions and types are generated from OpenAPI data based on our Rest API documentation, ensuring the SDK and the documentation remain in sync over time.
Types, IntelliSense, and IDEs
The Copilot Node SDK is written with Typescript applications in mind. The simplest way to explore what methods exist in the SDK is to use the IntelliSense features baked into modern Integrated Development Environments (IDEs). We recommend using VS Code, although any modern IDE with TypeScript support (e.g. WebStorm) will work.
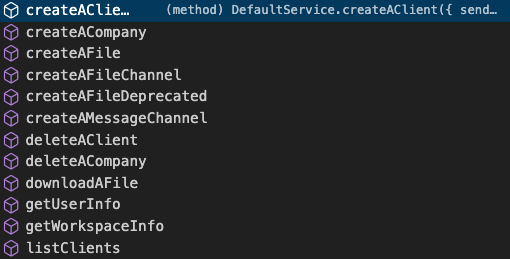
If you followed the example from Installation and Setup, you should now be able to type copilot. in your code and see the autocomplete menu pictured below:
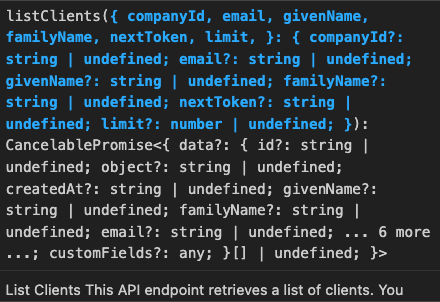
After selecting the function you’d like to call you’ll see another IntelliSense window that gives information about the parameters and return value associated with that function:
Session tokens
In the Installation and Setup section we walked through the steps of passing a token to the SDK. This token serves two very important purposes:
- Determining session information, like who the currently logged-in user is.
- Authenticating the Copilot API for marketplace apps when they’re installed in a workspace that’s not the app’s origin workspace.
How are tokens encrypted and decrypted?
Tokes are decrypted and included in the URL of your app as a search parameter and it will look something like this:
?token=14f570d3e89d2066de3da91785b775bc459beh8df414w7cf4a1145e794843790eaa3d7ba381771984486db02e56e48c06614fe1197c260700289f03d19c4f0ca27452eed53dd1b151aa82817847503b6af45d6c361f1d3d271af906ed873bb4883dfe5bf985b45f5ccfc4132b43e2806
The encryption key is derived from your app’s API Key using an AES 128 CBC encryption standard. We do not currently document steps for manually decrypting that token, the steps are built into the Node.JS SDK. If you’re interested in developing applications in a different programming language please reach out to us at [email protected] and let us know.
What information is encrypted in the token?
To see the contents of the token payload you can call the getTokenPayload function on the SDK:
const tokenObject = await copilot.getTokenPayload();
The contents of that token, represented as a TypeScript interface, are:
interface Token {
  clientId?: string;
  companyId?: string;
  internalUserId?: string;
  workspaceId: string;
}
The workspace will always be defined. At least one of the user IDs (clientId or internalUserId) will be defined in most cases.
Updated 10 months ago